XAMPP Install XAMPP (https://www.apachefriends.org/de/index.html) to the directory „C:/xampp“ Open Config of Apache (File: httpd.conf) Enter the root directory of the web server (localhost) at DocumentRoot Open Shell in XAMPP Control Panel Run the command: Open „C:\xampp\phpversion.txt“ in a text editor Copy the whole content of the file Go to the… Read more »
Unique configuration of each Tasmato Device Open the webserver of the module by enter the IP address in a browser Go to Configuration –> Configure Other Set Friendly Name 1 to a custom name Enable MQTT, if you want to use it Save the configuration Go to Configuration –> Configure… Read more »
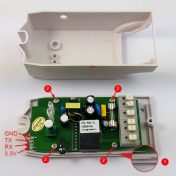
Connect a USB to UART adapter to the module Connect a simple USB to UART adapter to the Sonoff module (Attention: Make sure it is a 3.3V adapter or the jumper is set to 3.3V. 5.0V will damage the module) I used this adapter: USB zu TTL konverter UART modul… Read more »
Connect a USB to UART adapter to the module Connect a simple USB to UART adapter to the Sonoff module (Attention: Make sure it is a 3.3V adapter or the jumper is set to 3.3V. 5.0V will damage the module) I used this adapter: USB zu TTL konverter UART modul… Read more »
Install Arduino IDE (https://www.arduino.cc/en/main/software) Integrate ESP8266 board in IDE Open Arduino IDE Open File → Preferences (Arduino → Preferences on Mac) Insert the in the textfield Additional Boards Manager the url:http://arduino.esp8266.com/stable/package_esp8266com_index.json and select OK. Open the Board manger under Tools → Boards… → Boards Manager… Scroll to esp8266 by ESP8266 Community and click on it. Install the last version Download the newest Tasmota source code… Read more »
Home Assistant Config Helper is add-on for Visual Studio Code. The main advantage of the add-on is the auto completion of the entity-id’s from your Home Assistant configuration. Installation Installing Visual Studio Code (https://code.visualstudio.com/) Installing Home Assistant Config Helper Add-on from the marketplace (https://marketplace.visualstudio.com/items?itemName=keesschollaart.vscode-home-assistant) Open Visual Studio Code Settings Now… Read more »
Connect a USB to UART adapter to the module First remove the dome of the bulb. A good possibility is to cut around the dome with a cutter knife. Afterwards you can lift the dome with a flat object Than the isolation around the middle PCB must be removed. Simply… Read more »
Install nmap on raspberry pi: Add following configuration in configuration.yaml file. Home_interval are minutes that Nmap will not scan this device, assuming it is home After a restart of Home Assistant the tracker will scan the network and list all devices in the file known_devices.yaml. Now some options can be… Read more »
https://wiki.dolphin-emu.org/index.php?title=Bluetooth_Passthrough Here’s the step-by-step for Windows, all in one place, if that’s helpful: Download the Windows PR 4385 build here: https://dl.dolphin-emu.org/prs/pr-4385-dolphin-latest-x64.7z Extract the archive and launch Dolphin.exe once, then close it out. (This adds a new line your dolphin.ini) Download Zadig: http://zadig.akeo.ie/ Open Zadiq, and in the Options select List… Read more »
Ubuntu Config File öffnen sudo gedit /etc/default/rcS UTP Wert setzen Realtime: UTC=no UTP: UTC=yes Windows auf UTP setzten In HKEY_LOCAL_MACHINESYSTEMCurrentControlSetControlTimeZoneInformation einen DWORD (32-bit) – Wert anlegen mit dem Namen RealTimeIsUniversal. Diesen Wert dann auf „1“ setzen. Vorteil UTP Egal in welcher Zeitzone / Sommerzeit / Winterzeit man sich… Read more »